
SCIM User Provisioning
SCIM (System for Cross-domain Identity Management) is a standardized protocol that automates user management in Rekrutek by connecting your Identity Provider (IdP) as the source of truth for user accounts and access permissions.
With SCIM enabled, your Identity Provider automatically:
- Creates users in Rekrutek
- Updates user information
- Assigns roles and access permissions
- Deactivates users when access is removed
SCIM is compatible with major Identity Providers including Okta, Microsoft Entra (formerly Azure AD), OneLogin, and others that support the SCIM 2.0 standard.
What SCIM Manages in Rekrutek
Section titled “What SCIM Manages in Rekrutek”When SCIM is enabled, your Identity Provider becomes the system of record for users and user access in Rekrutek. User management is performed in your Identity Provider rather than in Rekrutek’s Team settings.
User Attributes Managed via SCIM:
Section titled “User Attributes Managed via SCIM:”- First name, last name, and email address
- User roles
- Location access
- Job/position access
- Location group access
- Opening-level access
Important Behavior:
- SCIM-managed users appear in your Rekrutek Team page but cannot be edited directly in Rekrutek
- Updates to SCIM-managed users must be made in your Identity Provider
- Non-SCIM users can still be managed manually in Rekrutek
- When a user is unassigned from the SCIM app in your IdP, they are deactivated in Rekrutek (not deleted)
Setting Up SCIM in Rekrutek (steps)
Section titled “Setting Up SCIM in Rekrutek (steps)”Step 1: Enable SCIM in Rekrutek
Section titled “Step 1: Enable SCIM in Rekrutek”-
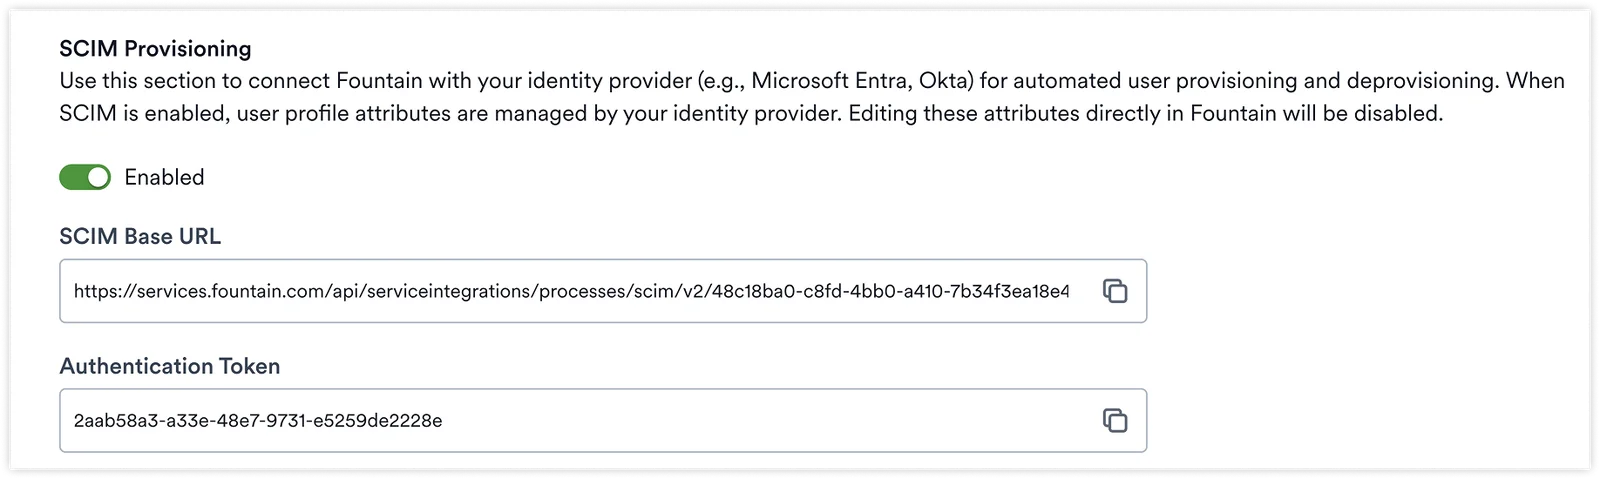
Navigate to Settings > Security > SCIM Provisioning
-
Toggle Enabled to turn on SCIM provisioning
-
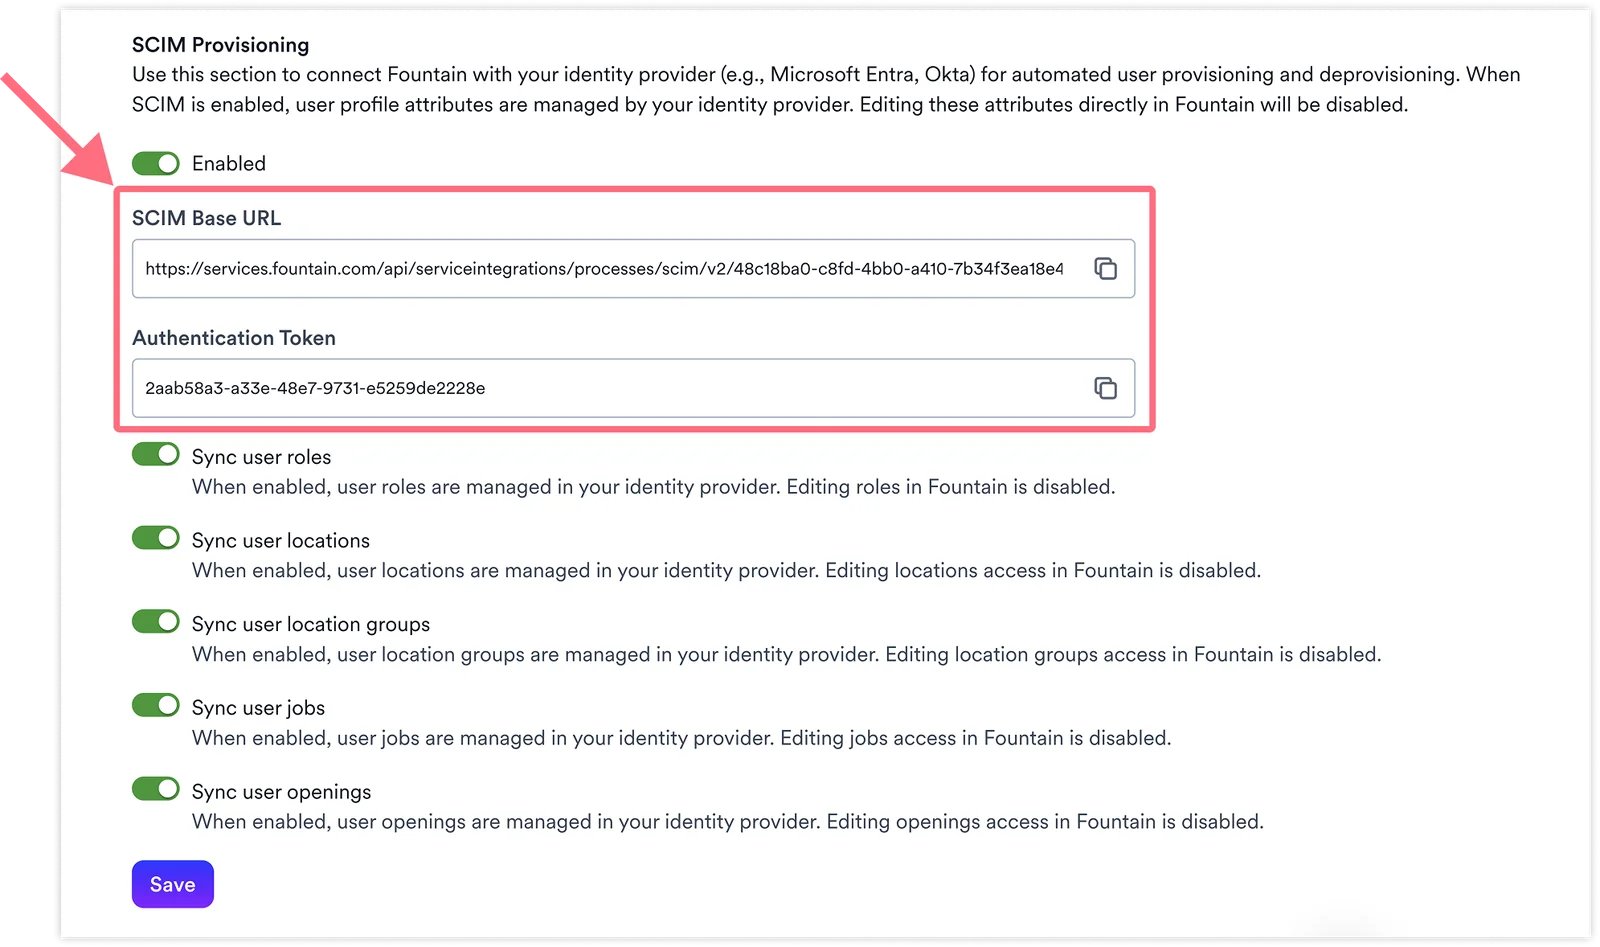
Copy the SCIM Base URL and Authentication Token - you’ll need these to configure your Identity Provider
Step 2: Choose What SCIM Manages
Section titled “Step 2: Choose What SCIM Manages”In the SCIM Provisioning settings, select which attributes your Identity Provider should control:
- Sync user roles: When enabled, user roles are managed by your Identity Provider
- Sync user locations: When enabled, location access is managed by your Identity Provider
- Sync user location groups: When enabled, user location groups are managed in your identity provider. Sync user roles
- Sync user jobs: When enabled, user jobs are managed in your identity provider. Editing jobs access in Rekrutek is disabled
- Sync user openings: When enabled, user openings are managed in your identity provider. Editing openings access in Rekrutek is disabled.
Step 3: Configure Your Identity Provider
Section titled “Step 3: Configure Your Identity Provider”The specific steps vary by Identity Provider, but the general process is:
-
Create a SCIM application in your Identity Provider
-
Enter connection details:
- Paste your Rekrutek SCIM Base URL
- Paste your Rekrutek Authentication Token (as Bearer token or OAuth)
-
Enable provisioning actions:
- Create users
- Update user attributes
- Deactivate users
-
Map attributes from your IdP to Rekrutek (see Attribute Mapping section below)
-
Assign users to the SCIM application
Attribute Mapping
Section titled “Attribute Mapping”SCIM allows you to map attributes from your Identity Provider to Rekrutek user attributes. This determines how user information and access permissions flow from your IdP to Rekrutek.
Required Attributes
Section titled “Required Attributes”At minimum, your Identity Provider must provide:
- First name
- Last name
- Email address
These are standard SCIM attributes and are automatically recognized by most Identity Providers.
Optional Attributes (Rekrutek Extension)
Section titled “Optional Attributes (Rekrutek Extension)”Rekrutek provides a custom SCIM extension to manage roles and access restrictions:
Extension Schema: urn:ietf:params:scim:schemas:extension:fountain:2.0:User
| Attribute | Type | Purpose | Notes |
|---|---|---|---|
role |
String | User role assignment | Must match exact role name in Rekrutek |
externalLocationIds |
Array of strings | Location access | Accepts Rekrutek Location IDs or exact location names |
externalJobIds |
Array of strings | Job/position access | Accepts Rekrutek Job IDs or exact job names |
externalLocationGroupIds |
Array of strings | Location group access | Accepts Rekrutek Location Group IDs or exact names |
externalOpeningIds |
Array of strings | Opening-level access | Accepts Rekrutek Opening IDs |
Attribute Behavior:
Section titled “Attribute Behavior:”- If
roleis omitted or doesn’t match an existing role, the company default role is applied - If access arrays are not sent or sent empty, the user will not be restricted for that dimension
- Multiple values grant access to all listed resources
- Invalid values are ignored
Example: For a location named “Atlanta” with UUID 3372067a-c2d5-4524-9525-1bcaf01fe586, either value is valid:
"Atlanta""3372067a-c2d5-4524-9525-1bcaf01fe586"
User Lifecycle Management
Section titled “User Lifecycle Management”Creating Users
Section titled “Creating Users”When a user is assigned to your SCIM application in your Identity Provider:
- The user is automatically created in Rekrutek (or updated if they already exist)
- User attributes are set based on your attribute mappings
- The user receives an invitation email to Rekrutek
- The user appears in Settings > Users in Rekrutek with SCIM indicators
Updating Users
Section titled “Updating Users”When user attributes are updated in your Identity Provider:
- Changes automatically sync to Rekrutek
- SCIM-managed attributes in Rekrutek reflect the IdP values
- Updates typically sync within minutes (timing depends on your IdP’s sync schedule)
Deactivating Users
Section titled “Deactivating Users”When a user is unassigned from the SCIM application in your Identity Provider:
- The user is deactivated in Rekrutek (soft delete)
- The user can no longer log in to Rekrutek
- The user’s data remains in Rekrutek but is marked as inactive
- The user can be reactivated by reassigning them to the SCIM app
Managing SCIM-Managed Users in Rekrutek
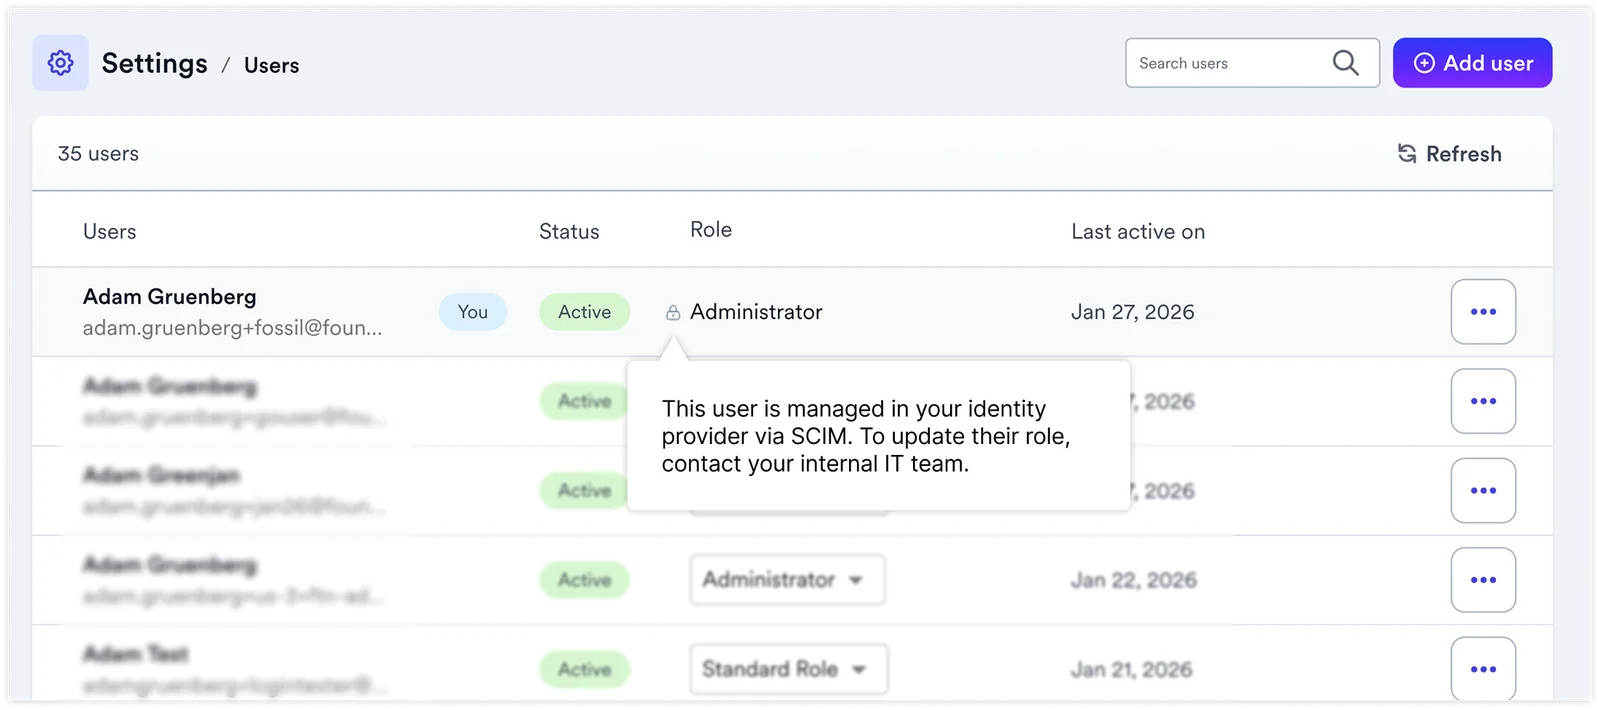
Section titled “Managing SCIM-Managed Users in Rekrutek”In Settings > Users, SCIM-managed users are identified with visual indicators:
- The Remove button is disabled for SCIM-managed users
- SCIM-managed attributes cannot be edited in Rekrutek
- You can view which roles and locations are assigned via SCIM
Mixed User Management: You can have both SCIM-managed and manually-managed users in the same Rekrutek account:
- SCIM-managed users are controlled by your Identity Provider
- Manually-managed users can continue to be invited and managed directly in Rekrutek
- You can still use the Rekrutek API to manage users separately from SCIM
Testing and Validation
Section titled “Testing and Validation”Rekrutek recommends the following approach for initial SCIM setup:
Testing Environment
Section titled “Testing Environment”- Use a separate, isolated Rekrutek account (empty sandbox or test tenant) for initial validation
- This prevents unintended changes to existing users during setup
- Assign a small test group of users first before rolling out to your full organization
Validation Steps
Section titled “Validation Steps”- Assign a test user in your Identity Provider
- Verify the user appears in Rekrutek with correct attributes
- Update the user’s attributes in your IdP
- Confirm changes sync to Rekrutek
- Unassign the user and verify they are deactivated in Rekrutek
- Check SCIM logs in your Identity Provider for any errors
Troubleshooting
Section titled “Troubleshooting”If SCIM provisioning doesn’t behave as expected:
Check SCIM logs in your Identity Provider
- Most IdPs provide detailed logs of SCIM operations
- Look for error messages or failed sync attempts
Validate attribute mappings
- Ensure attribute names match exactly (case-sensitive)
- Verify data types match between IdP and Rekrutek
- Check that custom extension namespace is correct
Confirm SCIM scope selections in Rekrutek
- Review which attributes are enabled for SCIM management in Settings > Security > SCIM Provisioning
- Verify your choices align with your attribute mappings in your IdP
Common Issues:
- Users not appearing in Rekrutek: Check that users are assigned to the SCIM application in your IdP
- Role not assigned correctly: Verify the role name in your IdP exactly matches a role name in Rekrutek
- Location access not working: Confirm location IDs or names are formatted correctly and match existing locations
- “Provisioning is not enabled” in Okta: Make sure you clicked Configure API Integration and enabled provisioning features
- Credentials test failed: Double-check that you copied the entire SCIM Base URL and Authentication Token without extra spaces
Identity Provider-Specific Guidance
Section titled “Identity Provider-Specific Guidance”The following sections provide specific configuration guidance for popular Identity Providers. While SCIM setup follows the same general principles across all providers, each has unique interface elements and configuration steps.
Okta Setup
Rekrutek’s SCIM implementation works seamlessly with Okta. Here are the key configuration points to ensure successful setup:
Critical Configuration Details:
Section titled “Critical Configuration Details:”-
App Selection: Use the SCIM 2.0 Test App (OAuth Bearer Token) from Okta’s app catalog - this version matches Rekrutek’s authentication method.
-
Username Format: Set Application username format to “Okta username” - this determines how Okta identifies users when provisioning.
-
Disable Groups: Uncheck Import Groups during integration setup - Rekrutek currently supports user provisioning only, not group provisioning.
-
Provisioning Features: Enable these three actions in Provisioning > To App:
- Create Users ✓
- Update User Attributes ✓
- Deactivate Users ✓
- Sync Password ✗ (Leave disabled - passwords aren’t needed for Rekrutek)
Custom Attribute Configuration:
Section titled “Custom Attribute Configuration:”To map Rekrutek roles and locations, you’ll need to create custom attributes in Okta’s Profile Editor:
For Role Mapping:
- Create a custom attribute with External name:
roleand External namespace:urn:ietf:params:scim:schemas:extension:fountain:2.0:User - Data type: String
- Map any Okta user field to this attribute (example: map
costCenterfield to Rekrutek Role)
For Location Mapping:
- Create a custom attribute with External name:
externalLocationIdsand External namespace:urn:ietf:params:scim:schemas:extension:fountain:2.0:User - Data type: String array
- You can map location UUIDs from Rekrutek OR use exact location names
What Happens After Configuration:
Once users are assigned to the SCIM app in Okta:
- They’re automatically created in Rekrutek with the attributes you’ve mapped
- Updates made in Okta (name changes, role changes, location assignments) automatically sync to Rekrutek
- SCIM-managed users appear in Rekrutek’s Team page but cannot be edited or removed in Rekrutek
- Unassigning a user from the SCIM app deactivates them in Rekrutek (soft delete)
Microsoft Entra (formerly Azure AD) Setup
Rekrutek’s SCIM implementation is fully compatible with Microsoft Entra ID provisioning.
In Microsoft Entra Admin Center:
Section titled “In Microsoft Entra Admin Center:”- Create a Non-gallery Enterprise Application
- Enable Provisioning
- Select SCIM as the provisioning method
- Paste Rekrutek’s Base URL and Authentication Token
- Entra will automatically discover all required SCIM metadata
- Configure attribute mappings in the Entra UI
- Assign users or groups to the application
Entra automatically handles:
- REST endpoints and HTTP methods
- Pagination rules
- Specific headers and payloads
- Sync frequency and retry logic
- Error handling
Helpful Reference: Microsoft provides a SCIM setup video for DocuSign that follows the same process Rekrutek uses: https://youtu.be/6m9NY8pnjfs?t=99 (SCIM configuration occurs at 1:39-2:10)